SANDRA NOBLE GOSS
1946-2022Home | Portfolio | About | Tech Notes
Technical Notes: Rolling Mill Printing
This is an archived page.

ROLLING MILL PRINTING:
©Sandra Noble Goss
These notes have been reproduced, with our permission, by the Durston Rolling Mill company as notes to accompany their mills.
[These advanced techniques assume that you have basic jewellery and metalworking skills. We offer these technical papers, originally presented as workshops, in a spirit of sharing information. We assume no liability for safety and health issues -- those are your responsibility. Please read Artist Beware by Michael McCann or The Artist's Complete Health & Safety Guide by Monona Rossol.]
THE ROLLING MILL:
The rolling mill is a machine designed to produce thinner gauges of sheet metal and wire. Most studio jewellers use a hand cranked mill (automated mills are used in the refining and jewellery industries). Each mill consists of two smooth, highly polished, hardened steel rolls, mounted in the housing parallel to each other. The rolling mill is used for reducing the thickness of sheet metal. The rolls for wire are cut with 'v' shaped grooves arranged in decreasing sizes, allowing for gradual reduction of wire diameter and producing a square cross section of wire. Most studio jewellers choose a 'combination' mill - half of the roll is smooth (for sheet metal) and half is grooved (for wire). This limits the width of metal to be rolled (averaging about 2" - 2.5").
Basic use and care of the rolling mill is covered in most jewellery and metalworking books, such as Oppi Untracht's Jewelry Concepts and Technology.
INTRODUCTION TO PRINTING:
Metal which is passed through the rolling mill under pressure with another material will become embossed with a pattern exactly the same as the material being used. Any small particle trapped between the metal and roll will 'imprint' on the metal. If you are attempting to roll a perfectly smooth piece of metal, this is not desirable. But this principle can be put to use to create embossed patterns and designs on metal.
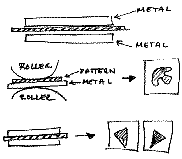
 The best way to imprint metal is to create a 'metal sandwich' with two pieces of metal (to be impressed) on the outside (the 'bread' in the 'sandwich') and the material being used as pattern between them (the 'filling').
ONE-SIDED vs. TWO-SIDED IMPRINTING:
If you wish to imprint on one sheet of metal only, roll the metal together with the imprinting material, using the roll as the other side of the 'sandwich'. This technique is preferable when using expensive materials (gold and sterling) but has it's drawbacks, as there is more possibility of damaging the rolling mills if materials that are too hard are used for imprinting. It best to make a 'metal sandwich' whenever possible - it produces two pieces of usable, imprinted metal with mirror-image imprints (especially useful for earrings, being symmetrical, but reversed).
ROLL PRINTING PROCESS:
1. Metal to be imprinted must be annealed, dry and clean. Depending on the use of the metal after being imprinted, you may wish an emery finish or tripoli or rouge polish. Usually the metal that is the pattern (the 'filling' in the sandwich) should not be annealed - if it is hard metal you will get a better imprint and may be reusable.
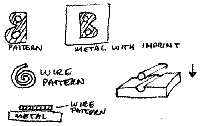
 2. Pattern imprinted will be a reverse of the design (important to remember if using letters and numbers in the design).
3. An object placed between two pieces of metal will create a recess in the metal (intaglio; a mechanical 'etching' effect). As the 'metal sandwich' passes between the rolls and is compressed, the imprinting material is pushed into the metal. Be careful not to roll the imprint so that the metal becomes too thin.
4. Make one pass only! Carefully adjust the gap by attempting to roll the first 1/2 inch (1 cm) or so. Trial and error and experience, along with written notes, are all part of this process. Once the correct gap is calculated, roll the whole piece in one continuous roll. Try not to stop part way through the pass.
 5. To emboss: use a plate with negative spaces so that when rolled the metal plates push into the recessed shapes on the pattern.
METHODS OF ROLLER PRINTING:
OBJECTS AND MATERIALS THAT CAN BE USED TO MAKE PATTERNS: objects that are too thick or three dimensional may not be appropriate (the metal is usually not thick enough to encompass the object and give a good imprint). Hard metal objects (steel) should only be used in the two-sided ('metal sandwich') method, as they may damage the steel rolls. The rolls should be cleaned thoroughly after using gritty materials like sandpaper. Thin metal should only be used with thin objects - thick imprinting patterns will make the metal too thin and weak. Some materials and objects that can be used (there are many more - experiment):
- paper
- fabric
- thread
- metal
- screen
- feathers
- lace
- wire
- masking tape
- washers
- plastic
- sequins
- leaves
- doilies
- thin keys
- sandpaper
- netting
- chain
 WIRE SECTION OF ROLLING MILL: rolling sheet metal through the grooved wire section of the rolls produces a corrugated effect. If the metal is passed through again at a different angle a cross-hatched pattern is achieved. Turned 90 degrees produces a chequered effect.
MASKING TAPE: masking tape will provide a textured pattern recessed into the surface of the metal. Lay tape out on a sheet of glass and cut desired shapes with a blade. Lift pieces off and apply to the metal. Because the tape adheres to the metal, there is little movement of the design during the rolling process. Multiple layers can be used to give variety of depths.
PAPER: paper provides a wonderful, sharply detailed imprint on well annealed metal. The metal picks up a matte texture from the paper. Where shapes have been cut out, metal will contact metal leaving a shiny pattern in contrast to the paper texture. Shapes can be cut out with a knife, with fine nail scissors or by folding the paper and cutting into the folds (good for an overall repeat pattern). Multiple layers of paper can be used - giving both embossed and recessed designs. A paper pattern can only be used one time. If you wish to repeat a pattern you can photocopy the design and cut out each time. Experiment with different sorts of paper, from regular bond, to tissue to heavy watercolour papers.
Treasure Pin: Brass (roller printed using pierced metal), Sterling Silver (fused). 5.5cm. ©Sandra Noble Goss
METAL PATTERNS AND PIERCED DESIGNS: Metal Shapes: different shapes can be cut out of metal and used to imprint. Cutting into a sheet of metal can produce intricate designs which will emboss the finished piece. Drilled holes will give small raised circles; saw cuts will give fine raised lines. Since saw piercing goes right through the metal pattern, a two-sided imprint will work.Wire can be used effectively to create linear intaglio patterns.
HAMMER AND PUNCH TEXTURES: designs can be made into a sheet of unannealed metal using punches, coarse files and hammers. This piece of patterned metal can be used for a one-sided imprint (making one copy only). Since the pattern is recessed into the pattern plate, the resulting pattern on the finished piece of metal will be embossed (raised above the surface). An old hammer can be engraved or filed with textures. When it is hammered onto to metal it leaves an embossed pattern. These can be used to give added texture to a pattern.
ROLLED PLATE AS PATTERN: designs can be imprinted onto a metal sheet which in turn can be used as a pattern. If the original design is recessed, it will produce an embossed pattern which has an interesting quality as it is one step removed from the original process.
ALUMINUM PLATE: Aluminum plates can be engraved easily with gravers or dental burrs on the flexible shaft. They are good for only one (at the most two) passes. The thicker the aluminum plate the deeper the cuts and the deeper the embossing.
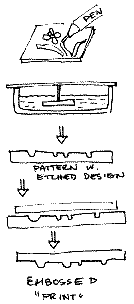
ETCHED PLATE PATTERN: brass, bronze, copper and mild steel can be acid etched to create patterns for roller printing. Steel is useful for a plate you may wish to reuse many times; always protect the surfaces of the rolling mill (with a softer metal such as brass or copper) when using steel plates. Thick brass and bronze will produce plates that can be reused.
- TO ETCH STEEL:
use one part nitric acid to 3 parts water or 2 parts hydrochloric acid (muriatic) to 1 part water. ALWAYS ADD ACID TO WATER, NEVER THE OPPOSITE! If you are not familiar with acids and their dangers, do not try this! Read about etching in a printmaking book for more details before you proceed. Use resists that a printmaker would use (asphaltum etc.). Use in well ventilated area and wear rubber gloves and eye protection. Do not inhale fumes.
 NON ACID ETCHING OF COPPER,BRONZE AND BRASS:
[More details on the etch page.]
Ferric chloride is a salt which gives a clean etch to copper-based alloys. Follow directions on the bottle. Wear rubber or latex gloves. Tapes such as electrical tape or brown packing tape can be used as resists. The real bonus of this material is that permanent markers used for writing on plastic will resist the etching action which allows you to draw or write (remember to reverse the letters for imprinting) directly on the metal. The ink can be removed with methyl hydrate (alcohol - use a fume hood and rubber gloves). The piece to be etched must be suspended upside down (design facing down) below the surface of the ferric chloride. Agitate occasionally for better action. Check the depth of the bite frequently. Clean the metal very well with dish detergent and water. Then clean with toothbrush or brass brush and baking soda to ensure the etching action is neutralized (important!!!). The finished piece can be used to imprint - the etched away sections will emboss.
[More details on the etch page.]
 INCREASE EMBOSSING EFFECT: when roller printing a thin gauge of metal, you can enhance the embossing by padding the back of the metal with layers of paper and rolling with more compression.
OTHER USES OF THE ROLLING MILL:
SOLDER INLAY: designs can be impressed into a sheet of metal and the recesses filled with solder. (future notes on solder inlay)
FOLD FORMING: Linear patterns can be produced on metal by folding and unfolding the metal. Because metal has a memory due to work-hardening, the fold remains as a raised line on the surface. Fold metal and pass through the rolling mill to compress the fold. Anneal, unfold the metal and pass through to compress and flatten the top of the fold line. Metal can be folded and unfolded many times, creating parallel or intersecting lines.
MULTI-METAL LAMINATION: see these notes
 TWISTED WIRE LAMINATION: Twisted and braided wires of different metals, soldered together, can be rolled to created squared decorative wires.
MOKUME GANE: A Japanese technique (means "woodgrain") of soldering thin sheets of different coloured metal together, rolling them through a rolling mill and relaminating those layers together again. The resulting sheet is then distorted and the layers revealed by grinding the surface down.
MAKING FLAT OVALS: If you pass a circular piece of metal or circular jump ring (wire) through the mill under pressure it will be stretched to an oval shape.
OTHER DISTORTIONS: Metal shapes can be purposefully distorted using the rolling mill. Drilled holes can become perfect ovals (similar but opposite to making an oval from a circle); edges are softened and straight edges become organic curves. Rolling wire in a paper sandwich gives slightly raised edges to the wire which now has a soft paper texture and is broadened.
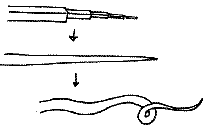
 ROLLING A TAPER: Wire can be forged into a graceful tapered end which can be used in many ways (spirals or tendrils etc). The rolling mill provides a short cut version. Anneal the wire to be tapered. Begin rolling at the first groove and roll as far up the wire as you wish the taper to extend. Move to the next groove along and roll part way up the wire, leaving part of the first rolled section unchanged. Continue rolling until the wire tapers in a series of 'steps'. Once you have rolled the taper continue refining the taper with a hammer on an anvil. Smooth the ridges between the steps with the hammer, turning the wire as you work to round out the squared off edges. If you wish squared taper, do not turn the wire. Once the ridges are smoothed out, file, sand and polish the tapered wire. If you wish to shape the taper, anneal and pickle before sanding and polishing.
©Sandra Noble Goss
TECHNICAL NOTES
Etching
Silver Etching
Photocopy Resist
Roller Printing
Multi-metal Lamination