SANDRA NOBLE GOSS
1946-2022Home | Portfolio | About | Tech Notes
Technical Notes: Multi-Metal Lamination
This is an archived page.

MULTI-METAL LAMINATION:
aka Metal Overlay
©Sandra Noble Goss[These advanced techniques assume that you have basic jewellery and metalworking skills. We offer these technical papers, originally presented as workshops, in a spirit of sharing information. We assume no liability for safety and health issues -- those are your responsibility. Please read Artist Beware by Michael McCann or The Artist's Complete Health & Safety Guide by Monona Rossol.]
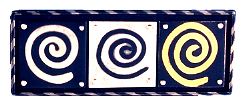
Spirals Pin: Sandra Noble Goss. Bronze, sterling 18K gold.
Multi-metal Lamination is a type of "faux" married metal which produces a freer, more "painterly" effect than the hard-edge, highly graphic, married metal. It is a technique in which designs may appear to float over other shapes and patterns. MML may be used in a figurative way or to produce over-all pattern.
MML is achieved by layering patterns of different coloured metals on top of a thick base plate. The patterns are soldered onto the surface, and then compressed by passing through a rolling mill. The resulting illusion is of a single piece of metal with patterns of different coloured metals "inlaid" into the surface.
Steps:
1.Begin with a thick sheet of metal (should not be wider than the width of the rollers in the rolling mill). This base plate may be copper, brass, bronze, sterling , nickel or gold. The base will show in the finished piece. A good gauge to begin with is 2 mm or 3/32" or more. Thinner metal may be used, but may result in a very thin final piece of metal.
2.Clean base metal well by sanding with emery paper. Thickly coat the entire surface with flux. Suspend the metal over the gap between two fire bricks to enable heating from both top and underside of the piece of metal.
3. Select patterns to be soldered onto the surface: Remember: use metals that will contrast with the base sheet of metal.
* Begin with the thickest materials for the first layer, leaving the finest wires or mesh for the last layer as the first layer of lamination may be compressed and rolled many times.
 WIRE PATTERNS: many patterns and shapes can be made using only wire. Use jump rings, stretched and rolled coils, 'v' shapes, zig-zags. Wire patterns should be flattened slightly before soldering, either by hammering or passing through the rolling mill. Sand the side which contacts the base plate.
a) Solder may be melted onto the wire before soldering onto the base plate. If that is done, pickle and clean with wire brush. Place the wire patterns on the fluxed base plate and heat until solder runs.
b) Place wire patterns on fluxed base plate and apply solder along the edges of the wire and heat base plate until solder runs. PLATE METAL PATTERNS: any shapes may be cut from plate. (Triangles, squares, circles, stars, flowers, irregular shapes, scrap metal pieces, etc.). Coat the entire underside completely with hard solder; pickle and wire brush; reapply flux to soldered side and place solder-side down onto base plate. Heat plate from both top and underside until solder runs. Heat long enough to be certain solder runs under all pieces.
 WIRE SCREEN (MESH): brass, bronze or copper screening is available in many thicknesses of wire and patterns. On a first layer lamination use the thickest screen (especially if meshes of different thicknesses are being used in the design). Roll to flatten wires slightly (to make better contact when soldering). Sand and clean before applying to fluxed base plate. Meshes may be distorted, stretched or have wire removed to make interesting patterns.
- SUGGESTED PATTERNS: thick rolled wire, stretched coils, jump rings, flattened twisted wires, sheet metal with pierced patterns or holes drilled in a pattern, wire mesh.
 4.Lay patterns on fluxed base plate. Apply hard solder along edges of pattern pieces (only if solder has not already been applied to the back of the pattern piece). With mesh, apply solder in openings in the screen. Heat with a large flame from both sides. Once the flux melts, heat mostly from the underside to enable observing the solder run and to see that all pattern pieces are lying flat on the surface of the base plate.
5. Quench and pickle. When clean, brush with brass brush.
![]() 6.Once the base plate is clean of fire scale and dry, roll it through the rolling mill compressing it gently with each pass. Continue rolling until the pattern is compressed into the base plate and is the same level.
6.Once the base plate is clean of fire scale and dry, roll it through the rolling mill compressing it gently with each pass. Continue rolling until the pattern is compressed into the base plate and is the same level.
7.Anneal the rolled metal and flatten with a rawhide mallet (the base plate should be reasonably flat so that the second layer of pattern will contact when soldering). It is a good idea to heat until the solder runs again (when annealing) to ensure all gaps are filled.
SECOND LAYER:
 Apply a second layer of patterns, overlaying them on the first layer. Repeat Steps 1 - 7. A third or fourth layer may be added. Repeat Steps 1 - 7 for each layer of pattern.
1.Apply thick layer of flux over entire surface.
2.Lay new designs on top of the rolled base plate. Apply solder around the edges of the new pieces and apply also to any apparent gaps in the first layer of soldered designs. Use hard solder.
3.Solder and clean as above.
4.Roll until second layer is compressed to the same level as the base layer and the first applied layer.
NOTE: The plate will be getting progressively thinner with each layer. If the sheet is rolled in one direction only the patterns and designs will be stretched. This can be desirable. To minimize the stretching of the pattern, turn the plate 90 degrees with each pass through the mill.
SUBSEQUENT LAYERS:
After the first or second layers, medium solder may be used. Judge when to use different solders based on how many layers of pattern will be applied and the need to solder the finished piece of MML onto another form or piece of metal. If the finished lamination is to be soldered onto a final piece, reserve a low melting point solder for that join. Reserve a low melting point solder for patching any gaps. Coat soldered areas with yellow ochre when touching up any gaps at the end.
1. Apply more patterns as in the first layer. Use thinner metal for pattern pieces now, to avoid thinning out the base plate too much (if a very thick pattern piece is applied now, it will require more compressing in the rolling mill to bring it flush with the base plate - this would result in extreme stretching of the first layer).
REMEMBER!
STRETCHING and DISTORTION:
If the metal is passed through the rolling mill in the same direction each time, the patterns will be stretched and distorted. If such distortion and stretching are not desirable, rotate the piece 90 degrees with each pass. There will be some stretching, but the original shapes will be maintained. The first layers of pattern will be more distorted than the final layer.
Stretching and Distortion are attributes of MML and should be considered a desirable result. It is this aspect that gives the loose, painterly effect of MML.
HINTS:
Soldering large flat pieces of metal to the base: Large flat pieces of metal are more difficult to solder successfully, without any gaps in the solder, than are wire and mesh. A BUBBLE may appear on such an area after repeated soldering and rolling. Try re-heating and pressing into the bubble to allow solder to flow. It may be necessary to drill a small hole into the bubble and apply more solder through the hole.
Prepare a sheet of MML for many uses other than the immediate use: MML suits producing a larger sheet than is needed for a particular project. Regard it as producing a raw material which can be used in a number of different pieces of jewellery. Save all scraps - they may prove useful sometime in the future.
 MML as a pattern: Previously made scraps of MML can be used as a pattern to laminate onto a base plate. Solder them onto a base plate and treat as any other pattern piece. Remember that they will continue to be stretched and distorted as the new plate is passed through the rolling mill.
Twisted wire as MML design element: pieces of Twisted Wire Lamination may be layered onto a MML piece; soldered and compressed as above.
 MML as inlay in Married Metal: Shapes cut out of a piece of MML may be inlaid into a married metal design.
COLOURING MML:
Finished MML pieces may be left natural colours of the metals. The best finishes are matte or slightly matte as the designs are obscured by a high polish: tripoli, brass brush, emery, Scotchbrite, sandblasted, steel wool. MML may be coloured in two ways:
HEAT TREATMENT:
Polish to a tripoli or rouge finish (or desired finish). Gently heat with a torch flame, watching for changes in colour of the copper (it is the best indicator). Copper will turn a range of colours from orange, to brown and to black. Sterling will turn a yellowish-green at first and then turn to a dark grey. Brass will remain bright yellow, but slightly darker yellow than its natural colour. Golds will not discolour in this way, and will produce more subtle colour differentiations. High polishes in gold MML will make the patterns almost invisible.
PROTECT SURFACE: with paste wax containing Carnauba Wax ("Trewax").
CUPRIC NITRATE PATINA:
 Cupric Nitrate Patina works best on a sanded or sandblasted finish, but will work on a tripoli as well. Use with a simple two-metal MML (eg. sterling silver with copper, brass or bronze). Copper nitrate patina will not adhere to sterling, but bonds with copper-based alloys. Patinate the surface, heating until the patina turns black. Build up several layers of black. Wash loose patina off under water.
a) polish gently with rough polish, removing patina off the sterling areas, leaving black on the copper (brass or bronze). Clean tripoli off the patina with detergent and a soft brush or cloth.
b) gently rub the metal under water with steel wool. This will remove patina from the sterling and leave it on the copper and will leave a matte finish.
PROTECT SURFACE: spray fixative like Krylon Matte Fixative; Tremclad Clear Varnish (glossy), etc.
|
SAFETY PRECAUTIONS: Always solder in a well ventilated area (under a fume hood). DO NOT INHALE FUMES! These advanced techniques assume that you have basic jewellery and metalworking skills. We offer these technical papers, originally presented as workshops, in a spirit of sharing information. We assume no liability for safety and health issues -- those are your responsibility. |
©Sandra Noble Goss
TECHNICAL NOTES
Etching
Silver Etching
Photocopy Resist
Roller Printing
Multi-metal Lamination