SANDRA NOBLE GOSS
1946-2022Home | Portfolio | About | Tech Notes
Technical Notes: Etching of Copper-Based Metals
This is an archived page.
ETCHING OF COPPER, BRASS AND BRONZE:
©Sandra Noble Goss[These advanced techniques assume that you have basic jewellery and metalworking skills. We offer these technical papers, originally presented as workshops, in a spirit of sharing information. We assume no liability for safety and health issues -- those are your responsibility. Please read Artist Beware by Michael McCann or The Artist's Complete Health & Safety Guide by Monona Rossol.]
This method of etching uses a prepared ferric chloride solution which also contains hydrochloric acid. This "etchant" is not a pure acid, but etches copper and copper alloys (like brass and bronze). It will not work on silver; see the silver etching page. It is available from electronics supply shops, such as Radio Shack or from chemical suppliers. It is generally used to clean or etch copper circuit boards. It can also be found at some printmakers' supply stores.
- Advantages over Acid etching:
- not a pure acid; does not require dilution; is not as dangerous or tricky to use
- resists are readily available and easy to use:
- permanent markers that are made for writing on plastic can be used as a resist, which allows for drawing and writing directly on the metal. Photocopies, liquid floor wax and packing tape can also be used as resist:
- fast working, clean bite
CAUTION: Although etchant is not a pure acid, it is a "corrosive poison". Read the label: avoid contact with eyes and skin, use with adequate ventilation.
- MATERIALS:
- "Etchant" (ferric chloride)
- selection of pens or tapes for resist
- glass or plastic container with lid, big enough to hold piece of metal
- baking soda (bicarbonate of soda)
- emery paper (fine) or superfine steel wool, or brass brush
- methyl hydrate or isopropyl alcohol
- rubber gloves, plastic tweezers
RESISTS:
PERMANENT MARKERS:
Staedtler Lumocolour #313, #317 - RED; our experience shows that the transparent red works best, but all transparent colours eg. green and blue, seem to work as well. The opaque black tends to lift off during the etching process (it may be that it has more pigment to make it opaque).
Sharpie permanent pens. We found they do not adhere as well as the Staedtler Red, but other jewellers have mentioned using them. Experiment with different brands to find the one you prefer.
TAPE:
cello tape, clear and brown packing tape (Grand & Toy call it "Tan Tape", a brown cello tape)
PHOTOCOPIES:
This specialized technique is described on another page. First you should read the methods described below.
METHOD:
1. Clean metal to be etched. Should be grease free with no scratches. Final finish should have a slight tooth (ink seems to adhere better than to a highly polished surface), but scratches which are too deep allow the Etchant to get underneath the ink and lift the ink off the surface. An ideal finish is achieved by rubbing with wet 600 Wet & Dry paper (emery or corundum) or scrubbing with wire brush, scotch brite or superfine steel wool. Scour in a circular motion and rinse under clean water. Surface must be very clean and grease-free.
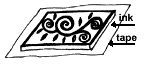
 2. Draw on metal with the pen - Staedtler pens come in various thickness of tips. We use the "M" (wide) and "S" (fine). Where you put ink will resist the etching action of the chemical. Areas that are left free of ink will etch. The inked areas will remain in relief. If you are etching a piece to be used as a pattern for roller printing another piece of metal, remember the DESIGN WILL BE REVERSED. This is important if you are using letters or numbers. Remember to reverse the design. Hold design up to a mirror to check everything is the right way around.
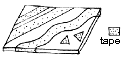 3. Clear Cellotape or Brown packing tape will resist Etchant and lasts longer than the ink. Tape is good for sharp-edge geometric shapes. Stick tape to a piece of glass and cut out shapes with an Exacto knife. Gently lift tape off glass with tweezers and press down onto the metal.
 4. Protect the back and edges of metal from being etched by applying Tan Tape to the back and edges of metal. This saves a lot of pen ink.
 5. Put etchant in glass or plastic container. Read the label for safety precautions. Submerge piece into Etchant with the design facing down (to allow particles of copper to fall away and not interfere with the etching process). It is best to suspend the piece in the solution, so it is clear of the bottom of the container. Either hang the piece from a wire strung across the container (you can make a tab of tape to attach to the wire) or tape on pieces of plastic to hold the metal above the bottom. Agitate the solution frequently by gently knocking the edge of the container.
 6. Depending on how much you have used the solution, the piece will be ready in 30 minutes (for new solution) to up to 2 hours (old solution, used many times). For quick action, do not dilute the solution.
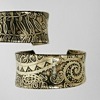
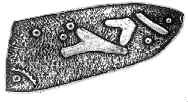 7. Etchant has an advantage over acids, in that it does not undercut, but cuts straight down from the resist. The surface that has been etched away has an attractive texture showing grain growth of the metal (shown here in a piece of etched bronze - a pen was used for resist). You can "pierce" a design, by leaving the piece in the solution until it has etched right through to the backing tape.
8. IMPORTANT: When the piece is etched to the desired depth, remove the piece and wash immediately with water and scrub with an old toothbrush or brass brush and baking soda (or ammonia solution). The baking soda will neutralize the Etchant and stop the etching action. If the Etchant is not completely neutralized, it will continue its etching action.
9. Remove the ink with alcohol:
Remove Staedtler inks with methyl hydrate (wear rubber or latex gloves and use in well ventilated area)
Remove Sharpie inks with ispropyl (rubbing alcohol)
-
Etched pieces in bronze, brass and copper can then be:
- patinated green or black and the surface sanded clean
- used to imprint another piece of metal using the rolling mill
- set like a stone in silver
- enamelled (if made of copper)
- inlayed and soldered into another metal
For etching in sterling silver, see this page.
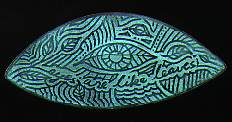
Eye Brooch, Eyes Are Like Leaves: Etched bronze, patina, ©Andrew Goss
|
SAFETY PRECAUTIONS: Always use Etchant in well ventilated area (preferably under a fume hood). DO NOT INHALE FUMES! Read the label on the bottle. Etchant will stain fingers and clothing brown - ALWAYS WEAR RUBBER OR LATEX GLOVES. WEAR GLOVES WHEN USING METHYL HYDRATE - it is absorbed directly through skin. Use it in a well ventilated area (preferably under a fume hood). |
©Sandra Noble Goss
TECHNICAL NOTES
Etching
Silver Etching
Photocopy Resist
Roller Printing
Multi-metal Lamination